
Sourdough Gets Serious
Our Sourdough Made Simple approach makes great bread easily. But if you’re ready to take step up — to bake with more precision and get even better results — this guide is for you. It may look detailed, but don’t be put off! The only tricky part is planning your schedule — the hands-on work is minimal, and there’s no kneading at all.
This method takes a little longer, so the key is to find a baking rhythm that fits your day.
Step 1: Convert Your Starter to a Liquid Starter
Your starter is already strong — we’re just adjusting its hydration.
Goal: 100% hydration (equal parts flour and water).
Mix:
120g dough starter
140ml water
75g white flour
25g wholemeal flour
Mix thoroughly using a butter knife until it is a nice liquid consistency. Cover loosely (cling film with rubber band or jar lid) and leave at room temperature overnight. By morning, it should be bubbly, tangy, and active.
Discard all but about 50g of the liquid starter — or approximately 1cm in the bottom of your jar (this feels scary, but trust us, it works). If you don't want to just tip this down the sink, look up online recipes for discarded sourdough starter - there are lots of great things you can cook with it including sourdough pancakes).
Feed again with:
75g white flour
25g wholemeal flour
100ml water
Cover and leave overnight. By morning, your liquid starter is ready.
You can bake immediately or store it in the fridge for later use. But if storing it, feed it again the night before you bake so it’s strong and active. (The same quantities as directly above)
What you will need
Of course, the starter is the most crucial ingredient, and because you already have a perfect starter, this technique is absolutely guaranteed to work.
But there are a few extra items that you will need for this recipe.
Cast-iron style ovenproof dish with lid around 20-26cm, round or oval — this creates the steamy, sealed environment that improves the crust. (Nb- you can get these cheaply from places like Sainsbury’s and Robert Dyas, they don’t need to be a fancy brand)
Large beaker, jar, or tumbler — for converting your dough starter into a liquid starter. It will either need a lid, or cling film on top secured with a rubber band
Two airtight plastic bags — to stop your dough drying out during the overnight fridge prove.
Baking parchment.
Flours: white, wholemeal, and a little dark rye (optional but excellent for flavour).
Optional: Digital thermometer — helps with fermentation control, but not essential.
Baker’s Note
At the moment the dough starter is about 50% hydration. This just means there is a water to flour ratio of 2:1. To turn it liquid we want to get the ratio up to 1:1.
Once it is at 1:1, any time you feed it, you feed at the same 1:1 ratio - i.e. exactly the same amount of flour and water.
Liquid starter are a little more fickle than dough starters, so I always like to keep my dough starter ticking along separately so it is there as a back-up if I get lazy with my liquid starter. However if you are short on space, you can just keep your liquid starter alone.
Much like your dough starter, if you aren’t baking, you should still discard and feed your liquid starter. You can throw out all but about a centimetre in the bottom of your container and add 75g white flour, 25g wholemeal and 100ml of water any time it needs feeding. With a liquid starter I would recommend doing this at least once a week if possible, and always feed it the night before you plan to bake.
Bake Day
You ideally need to bake on a day when you will be able to give your dough some attention over 5-6 hours (you don't need to be there the whole time, but you want to stick roughly to this schedule.
The cold prove in the fridge — after this initial 5-6 hours — should be 14-16 hours or upwards, (there is no real upper limit so there’s no need to bake at a specific time. I often make two loaves—baking one on the first day and leaving the other in the fridge for another 24 hours — this way, I have fresh bread on two consecutive days.)
Example baking Schedule
(Obviously you can do this at any time of day, as long as the durations stay the same)
10am-11am: autolyse - this is where you combine the flour and water (but not the starter and salt) and simply let it sit for an hour to start breaking down and start some enzymatic reaction ready for fermentation
11am-4pm: first prove - also called bulk fermentation - this is where you add the starter and salt, combine and leave to prove in a large bowl at room temperature. During this phase you will want to do three or four very simple stretch and fold sessions. More on that in a moment.
4pm until 8am (or whenever you want to bake): second prove - cold fermentation in the fridge - this needs to be overnight, but can actually be for as long as you want. So you are not bound to start baking at any particular time.
A Note on Temperature
Temperature plays a huge role in how well sourdough proves. To reduce variability, it helps to control your water temperature and be mindful of room conditions.For best results, aim for a dough temperature around 23°C. Unless it’s the middle of summer, you’ll likely need to slightly warm your water to reach this.You can use a digital thermometer to check, or simply heat the water in a jug in the microwave for about one minute before use. This method works well most of the year—only skip it during the hottest months.
Baking Two Loaves
Recipe for Two Loaves
Ingredients:
775g strong white bread flour
115g wholemeal flour
50g dark rye flour
605g water (warmed in the microwave for one minute)
50g additional water, reasonably
hot16-18g salt
Autolyse (one hour)
Mix the flours together, then add the 605g warmed water. Use your plastic scraper or wooden spoon to mix until all the water is absorbed and no dry flour remains at the bottom of the bowl. You’re not kneading here—just mixing until everything is evenly combined. (Note, if you are using a digital thermometer you are aiming for an internal dough temperature of 23 degrees, but warming the water for a minute in the microwave seems to give consistently good results as a rule of thumb)
Cover the bowl with a towel and let it rest. If it’s winter or your kitchen is particularly cold, consider placing the bowl near a radiator or other gentle heat source. Otherwise, room temperature is fine.
The autolyse takes about one hour. You don’t need to do anything during this time.
Mixing
After your autolyse, it’s time to add your starter. Don’t worry too much about exact quantities—around 250g in total is fine. You can tip it all in, leaving about 50g of the starter in your jar as you would for a discard and feed. Mix it in using a dough scraper or your hands.
Add 16–18g of salt (use 16g if you prefer less salt, 18g for more flavour).
Next, add the remaining 50g of hot water bit by bit.
Mix it in with your hands until incorporated. This is the trickiest part of the process, as you’ll need to judge how much water your dough can handle. It should feel wetter than a typical dough — that’s normal — but not so wet that it becomes unworkable. For your first bake, aim to use about 25ml of the extra water (unless the dough clearly needs more). You can add more next time as you get a feel for it.
Make sure everything is well mixed, then cover the dough and leave it at room temperature.
Bulk fermentation with stretch and fold (5 hours total)
This recipe doesn’t require kneading, but during the first couple of hours, try to perform a stretch and fold every 30 minutes.
Here’s how:
Imagine the dough divided into four compass points—North, South, East, and West.
Starting from one side, slide your hand under the dough, pinch a handful, lift, stretch it up, and fold it back over itself toward the center.
Rotate the bowl and repeat from each point of the compass. (One helpful image is to imagine lifting and closing four petals of a flower)
That’s one full round of stretching and folding.
If you’re short on time or need to step out, don’t worry—consistent fermentation is more important than the full stretch-and-fold routine. Aim for three or four sets if possible, but your dough will still develop well even with fewer.
Leave the dough to rest the 5-hour bulk fermentation.
Pre-Shaping
Once bulk fermentation is complete, it’s time to pre-shape your dough. Flour your work surface well, as the dough will be sticky.
Turn the dough out, fold it together gently into a rough round shape, and using your scraper and your hands, tighten it into a neat round ball shape. You can lift it slightly off the board and tuck the edges underneath to help shape it. Don’t worry too much about perfect technique here; the goal is simply to form a smooth, tight round.
If the dough is still too sticky to work with, add more flour to your hands or the surface. Now cut your dough perfectly in half with a bread knife, and repeat the shaping process so you have two round balls. A great technique is to use your left hand to support the dough ball, then use your right to grab the dough from the side, pulling it back towards you and tucking it under the ball, repeatedly, turning to the dough ball as you go, to get it really taut and smooth.
Cold prove (14-16hrs minimum — but as long as you want)
Dust your proving baskets generously with plain flour or rice flour, if you have it. Make sure to cover all the nooks and corners.
Using your scraper or hands, gently lift the shaped dough and place it into the basket, smooth side down.
Take a large plastic bag, place the basket inside, and twist the bag closed to trap some air inside. This prevents the dough from drying out. Slide into the fridge so the bag stays pinned closed. Repeat with the second loaf.
Baking
Place your Dutch oven on a middle rack and preheat it to 235°C. Allow at least 30 minutes for it to reach full temperature.
When ready, remove one of the baskets from the fridge and take off the plastic bag. Cut a piece of baking parchment roughly the same size as your basket (or slightly larger). Place it on top of the dough, then put a small board or tray on top. Flip the whole thing so the dough ends up sitting on the parchment.
Using a sharp blade or lame, score the dough lengthways from end to end. Aim for a clean, confident cut about ½–1 cm deep right to the edges — this helps the loaf expand nicely in the oven.
Remove the Dutch oven from the oven. Holding the edges of the parchment, gently lower the dough inside, then replace the lid as quickly as possible. Bake for 25 minutes with the lid on.
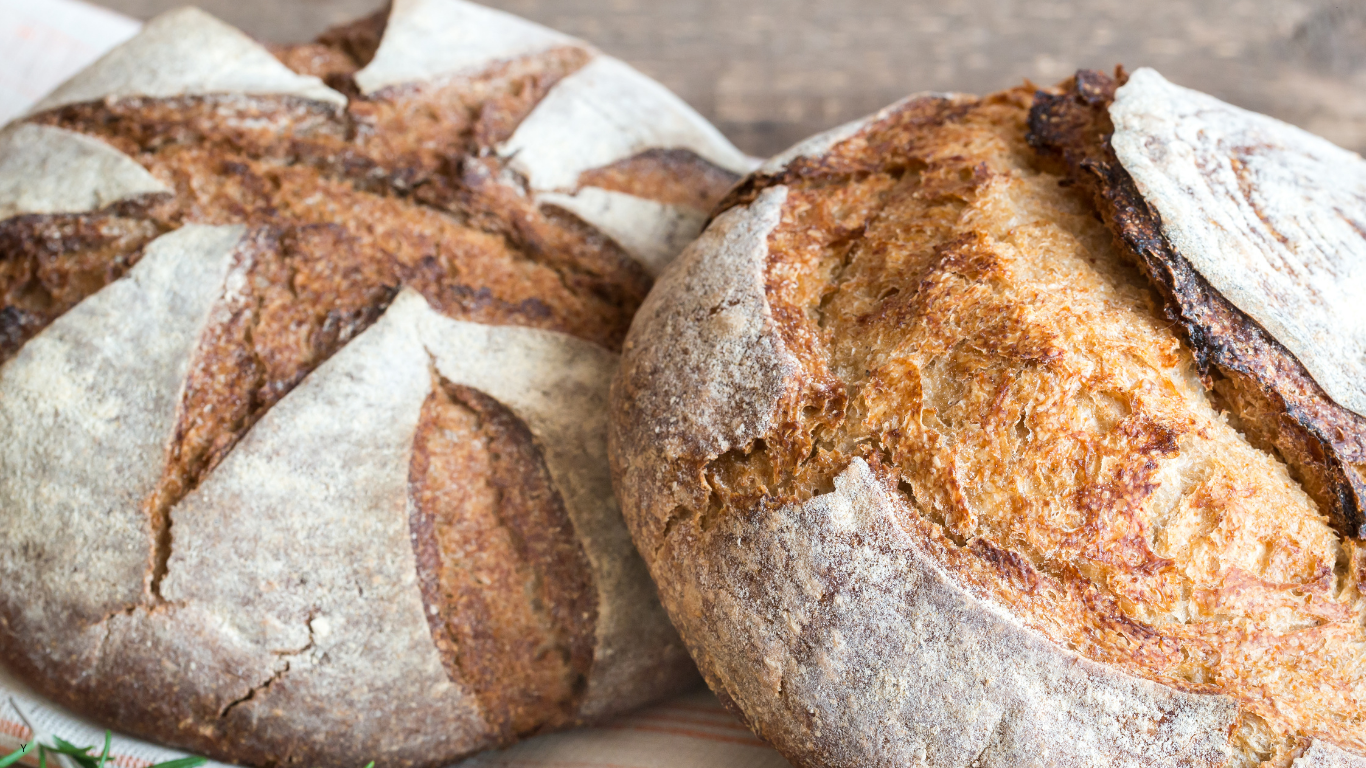
After 25 minutes, remove the lid and continue baking for another 25 - 30 minutes uncovered. The loaf should rise beautifully, with an open crack and a golden, blistered crust.
Once baked to your liking, lift the loaf out and place it on a wire rack to cool.
If you’re baking a second loaf, return the Dutch oven to the oven (with the lid on) for about 10 minutes to bring it back up to temperature before baking again.
Let the loaf cool for at least 1 ½ hours before slicing — cutting too soon can crush it.
Final Notes
As mentioned earlier, you can leave the second loaf in the fridge for another whole day if you would rather bake fresh bread two days running.
If you want a slightly softer crust, leave the lid on for slightly longer, but keep total baking time the same.
If you follow this process, you’ll produce an outstanding loaf with a crisp crust and open crumb. It takes some planning, but once you get used to the rhythm, it becomes second nature.
The only downside? The bread is so good, you might never want to bake it any other way.